Pages

Saturday, April 20, 2013

Nutsedge Home Lawns


 Nutsedge Control In Home Lawns

Marty Quinn
Phoenix AZ 
TPC. Golf Course


Nutsedge (Cyperus esculentus L.) is a common weed found in many home lawns and other turfgrass areas in Arizona & the United States. The color, growth habit, and rapid growth rate make nutsedge a prominent distraction in the aesthetics of high quality lawns. In addition to home lawns, this weed is also a significant problem in the turfgrass areas of parks, industrial grounds, athletic fields, and golf courses.

Plant Description

  Nutsedge is distinctive and relatively easy to identify. The stems are erect, triangular-shaped and yellow-green in color. The leaves are also yellow-green, wide (0.38 to 0.50 inch) bladed with a thick mid-vein and a very waxy covering. The shallow, fibrous root system often produces many nut-like tubers, which are underground food storage organs. Each of these tubers can germinate and produce new plants. Each new plant can also produce rhizomes which can give rise to additional new plants.
Figure 1. Yellow nutsedge
Figure 1. Nutsedge
 Nutsedge is a warm season perennial plant. The above ground foliage does not survive winters in all areas. However, as soils warm during the late spring and early summer period, germination of tubers and seed produced by plants from previous years are capable of producing new  nutsedge plants. Heavy infestations of this weed in lawns and other turfgrass areas usually become readily apparent in July and August.
Figure 2. Yellow nutsedge rhizomes
Figure 2. Nutsedge rhizomes

Growth Habit

The color, texture, and growth habit of nutsedge all contribute to aesthetic incompatibility with the desirable lawn turfgrasses. In addition to the aesthetic differences, the leaves of this weed have a rapid rate of vertical elongation resulting in their frequent protrusion above the canopy of the desirable grasses. Combined, these distractions make lawns unattractive during the mid to late summer period. Nutsedge thrives under warm, conditions. This weed is often most problematic during summers with normal rainfall. Management and environmental factors, including improper mowing, nutrient deficiencies, insect damage, drought stress, etc., which stress or reduce the density or competitive ability of the desirable turfgrasses, will often lead to increased populations of nutsedge.

Management Options

Unlike most lawn weeds, nutsedge is not controlled with applications of traditional annual grass weed or broadleaf weed control products. This weed is a member of the sedge family and requires the use of very specific herbicides to achieve satisfactory control. Regardless of the control strategy selected, the plan should be initiated when the weeds are young and immature. Eradication from lawns, flower beds although difficult, and next to impossible can be accomplished through the following approaches.

Hand Pulling

If nutsedge plants are present, hand pulling is the best way to selectively eradicate the weeds. Begin physically removing the weeds as soon as the weed plants are observed. Removal of the entire plant including root systems is necessary. Pulling mature plants is difficult. These plants will often break off at the soil surface allowing regrowth and tuber development to continue. After removal, homeowners are advised to recheck the area periodically for regrowth. This approach is effective only if performed on a regular basis.

Homeowner Treatment

 Control through the use of herbicides can be a satisfactory option, but will eliminate the other desirable grasses and plants. Homeowners may purchase, through retailers, herbicides to eliminate this weed. The performance of these products is dependent on the user accurately following the "Directions For Use." Normally, two applications are required with the repeat application made 10 to 14 days following the initial application.  To ensure adequate herbicide absorption, do not water the lawn for at least 24 to 48 hours after product application. Applications should ideally be initiated in the late spring/early summer when the nutsedge is young, actively growing, and is most sensitive to herbicidal control. Once this weed matures, control is difficult regardless of the treatment schedule. Unless you can get an act of Congress to step in. Hand Pulling or digging is the preferred method.

Professional Application

The most effective turfgrass herbicides currently available for nutsedge control are "Basagran" (bentazon) and "Manage" (halosulfuron). These herbicides are not sold through typical retail outlets. Homeowners desiring applications of either of these two chemical controls are encouraged to contact a licensed, commercial lawn applicator. Even with the use of these herbicides, a few weeks time may be required to eliminate the plants that are present and additional, repeat applications to control germinating nutlets may be necessary at a later time. As with the products available to homeowners, these herbicides perform best when treatments are made on young, actively growing nutsedge plants.
Homeowners should make note of the control strategies that are successful. Because of the seed and tubers that remain in the soil, repeat infestations in subsequent years should be anticipated.

Saturday, March 30, 2013

How to Bleach Furniture


In most cases, bleaching is essentially a first-aid measure, not a routine part of refinishing. A piece of furniture should be bleached if the surface is marked by stains, black rings, or water spots; if the wood is discolored or blotchy; if the color is uneven; or if an old stain or filler is left after the finish is removed. Old filler is often a problem with oak, walnut, and mahogany. Bleaching can also be used to even the color of a piece of furniture made with two or more woods. It can lighten the darker wood to match the lighter one.
Before you use bleach on any piece of furniture, make sure the wood is suitable for bleaching. Some woods don't accept bleach well -- cherry and satinwood, for instance, should never be bleached. Some woods, such as bass, cedar, chestnut, elm, redwood, and rosewood, are very difficult to bleach, and some -- notably pine and poplar -- are so light that bleaching makes them look lifeless. Birch, maple, and walnut can be bleached, but bleaching destroys their distinctive color. And the rare woods -- mahogany, teak, and the other choice woods -- seldom benefit from bleaching. Common woods that are easy to bleach, and may benefit from it, include ash, beech, gum, and oak.

Choosing a Bleach

Not all bleaching jobs call for the same type of bleach. Depending on the problem you want to correct, you may need a very strong bleaching agent or a relatively mild one. Below are some common bleach options you might want to consider.
Laundry Bleach: This mild bleach can solve most refinishing color problems, from stain or filler not removed in stripping to ink stains and water spots. It works well for blotchy areas and for slight overall lightening, but it won't change the color of the wood drastically. Before you use a stronger bleach on any piece of furniture, try laundry bleach; it usually does the trick.
Oxalic Acid: Oxalic acid, sold in powder or crystal form, is used to remove black water marks from wood. It is also effective in restoring chemically darkened wood to its natural color. You're not likely to encounter this problem unless you have a piece of furniture commercially stripped because lye and ammonia, the chemicals that discolor wood, are not recommended for nonprofessional use. Oxalic acid must be used on the entire surface of the wood, because in most cases it also bleaches out old stain. You may have to bleach the entire piece of furniture to get an even color. Oxalic acid is more effective in lightening open-grained wood than close-grained.
Two-Part Bleaches: The two-part commercial wood bleaches are used to lighten or remove the natural color of wood. If you want a dark old piece to fit in with a roomful of blond furniture, this is the bleach to use. Two-part bleach is very strong and must be used carefully; wear rubber gloves and safety goggles. This type of bleach is also expensive. Several brands are available.

Bleaching Techniques

Whatever bleach you use, remember that the results are permanent -- you may be able to restain if you make the wood too light, but uneven bleaching is very hard to remedy. Make sure the wood is absolutely clean, and touch it as little as possible. The bleach must penetrate the wood evenly.
Before applying the bleach, test it on a scrap piece of the same wood or on a hidden part of the piece of furniture. Make sure you know exactly what the bleach will do and how fast. In general, bleaches act quickly on soft woods and slowly on hard woods.
Bleaching isn't difficult, but it does require some precautions -- bleaches are fairly strong chemicals. The stronger ones can damage skin, eyes, and lungs. Wear rubber gloves and safety goggles when working with bleach, and make sure your working area is well ventilated. Follow the bleach manufacturer's instructions exactly. If you get bleach on your skin, wash it off immediately.
Bleaching also requires careful application and removal. With any bleach, use a synthetic-bristle brush -- the chemicals will damage natural bristles. Apply the bleach along the grain of the wood, wetting the surface evenly and thoroughly; there should be no dry spots and no puddles. Let the bleach work as detailed below.
After bleaching, wipe the wood clean with a damp cloth. To remove any residue, neutralize the wood thoroughly; use an ammonia solution for oxalic acid, a borax solution for laundry bleach or two-part bleaches. Wash the bleached wood thoroughly with the appropriate neutralizer; be careful not to overwet it. Then, working quickly to prevent water damage, rinse the wood with clean water and dry it thoroughly with a soft cloth. Let the piece of furniture dry for at least two days before doing any further work on it.
Laundry Bleach
Apply laundry bleach full-strength, brushing it evenly over the entire surface. If you're removing spots or lightening discolored areas, apply bleach full-strength to those areas. Laundry bleach works quickly. After a minute or two, you should be able to see the stain fading. If you're bleaching out an old stain, wipe the bleach off with a damp cloth when the stain has lightened.
If you're spot-bleaching to remove spots or blend color areas, wait until the bleached spots are roughly the same color as the rest of the wood; then apply bleach again over the entire surface. Remove the bleach with a damp cloth when the color is even. Finally, neutralize the treated wood with a solution of 1 cup of borax dissolved in 1 quart of hot water. Neutralize, rinse with clean water, and dry it thoroughly.

Oxalic Acid

Oxalic acid is not caustic, but it is poisonous. Wear rubber gloves and safety goggles, and make sure ventilation is adequate. To prepare the acid, mix a saturated solution with warm water: 1 ounce of powder or crystals per 1 cup of warm water. Make sure you prepare enough bleach to treat the entire surface or piece of furniture.
Apply the acid solution evenly to the wood, brushing it on along the grain to cover the entire surface. On soft wood, you'll see results very quickly; on hard woods the bleaching takes longer. Let the acid work for about 20 minutes, then wipe it off with a damp cloth. If the surface isn't fully or evenly bleached, reapply the acid as necessary. On hard woods, complete bleaching may take up to an hour. Wipe the wood clean with a damp cloth, and wash it with clean water. Then neutralize it with a solution of 1 cup of household ammonia and 2 quarts of water. Rinse it again with clean water, and dry it thoroughly.

Two-Part Bleaches

Two-part bleach is easy to use, and usually works very quickly. The two components of the bleach -- labeled "1" and "2" or "A" and "B" -- are usually applied separately. Read the manufacturer's instructions and follow them exactly. The first solution is usually allowed to work for about 20 minutes before the second solution is applied.
Following the directions carefully, apply the first solution and let it work; then apply the second solution. One treatment usually bleaches the wood completely, but if the wood isn't light enough, treat it again. Wipe the bleached wood clean with a damp cloth, and then neutralize it with a solution of 1 cup of borax dissolved in 1 quart of hot water. Rinse the wood with clean water, and dry it thoroughly.

Post-Bleach Treatment

Treatment with any bleach raises the grain of the wood, even when the piece of furniture has already been thoroughly sanded. To prevent the raised grain from affecting the finish, it must be re-sanded to the level of the wood surface after the wood is dry.
After bleaching, let the piece of furniture dry for at least two days. Then sand the grain down lightly with grade 5/0 or 6/0 sandpaper; be careful not to roughen the surface. Because there may still be some chemical residue in the wood, wear a breathing mask and use a vacuum to remove sanding dust. Wipe the wood clean with a tack cloth.
One other complication of bleaching, especially with laundry bleach, is that the wood may be left with a whitish or grayish color. This is not serious; it indicates that the bleach has dried out the fibers of the wood surface. On hard woods, it disappears when the finish is applied. On soft woods, the gray color may be pronounced and the loose fibers obvious. To remove them, rub the wood firmly along the grain with No. 000 steel wool; rub the entire bleached area, and make sure the color is even. The grayish cast will disappear completely when the finish is applied.
You're almost ready to start staining your furniture, but there's one more crucial step. Before you can apply any sort of finish to wood, you have to prepare the surface by sanding it down. In the next post, you will learn all about sanding, including how to get into those tricky, tight spaces.


Wednesday, March 27, 2013

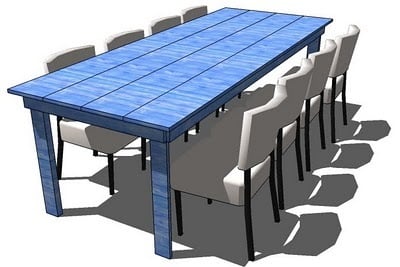
Build a Rustic Patio Table

Dimensions

Dimensions: 
Rustic Table
Dimensions: 
96" x 36" x 30" high (approximate)

Materials and Tools

Shopping List: 
4 – 2x2s, 8′ Long 4 – 1×4, 8′ Long 4 – 1×10, 8′ Long 1 – 2×4, stud length or 8′ length 2″ screws 1 1/4″ screws wood glue wood filler sand paper
wood glue
wood filler
120 grit sandpaper
primer
wood conditioner
paint
paint brush
Tools: 
measuring tape
square
pencil
safety glasses
hearing protection
drill
circular saw

Cut List

Cut List: 
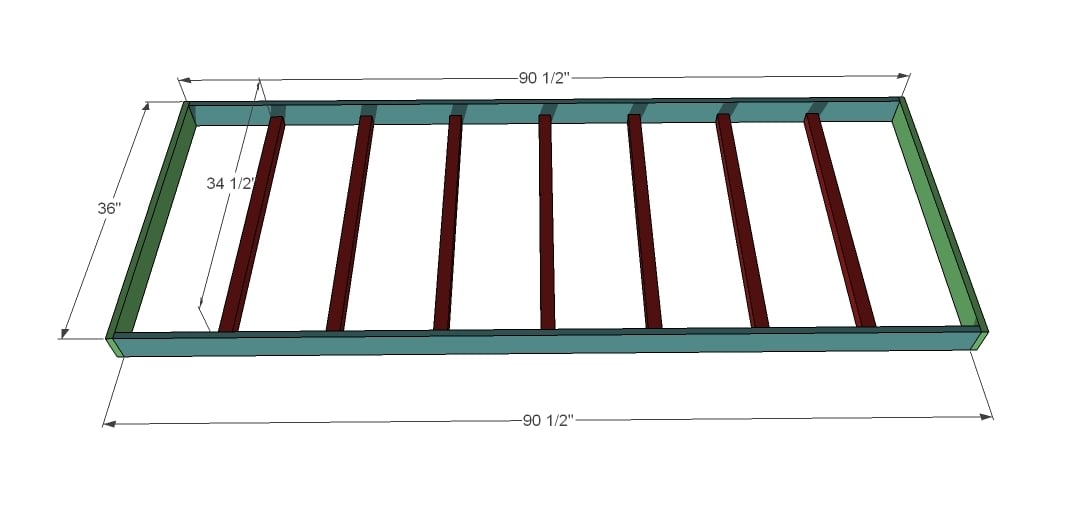
2 – 1×4 @ 90 1/2″ (Side Aprons) 2 – 1×4 @ 36″ (End Aprons) 8 – 2×2 @ 34 1/2″ (Under Tabletop Supports) 4 – 1×10 @ 96″ (Tabletop Pieces) 2 – 1×4 @ 29 1/4″ (Legs) 2 – 2×4 @ 29 1/4″ (Legs) 4 – 2×2 @ 12″, ends mitered at 45 degrees (cross supports)

General Instructions

Predrill and countersink your screw holes. Keep outside edges flush. Take a square after each step. Work on a clean level surface and use necessary safety precautions.

Step 1

Rustic Table
Table Top Supports and Apron. Build the tabletop supports and aprons as shown above. The supports are spaced 10″ apart. Use 2″ screws and glue, countersinking the screws.

Step 2

Rustic Table
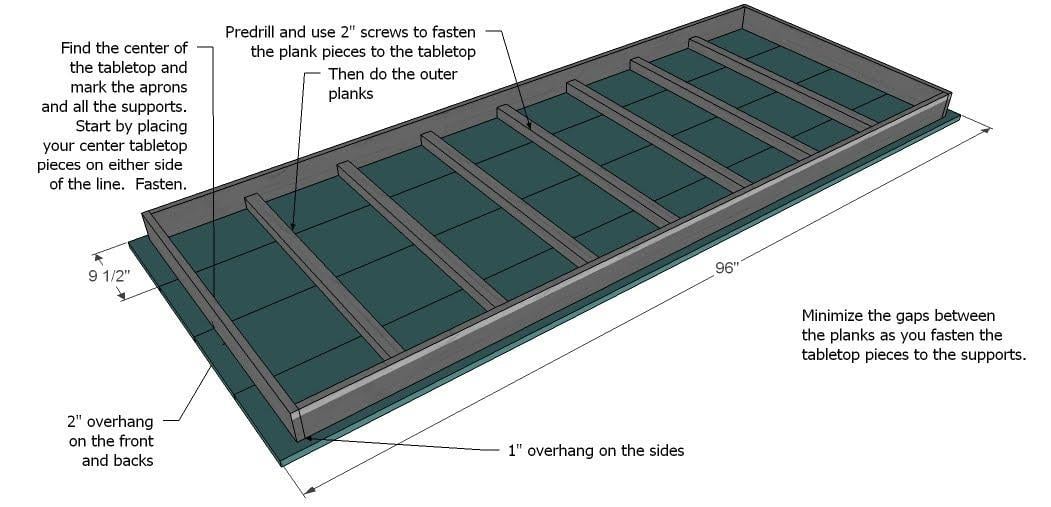
Tabletop Pieces. Take a square of the tabletop. Then find the centers of the tabletop supports and the end aprons and mark. Line up the center tabletop pieces with these marks and fasten through the bottom using 2″ screws and glue. Minimize the gap between the tabletop boards as you go. Deer Valley Rustic Furniture

Step 3

Rustic Table
Tabletop Screw Hole Patterns. Mark out the screw holes on the tops of the table as shown above. Then predrill and screw the tabletop pieces to the end aprons. Make sure the table is square prior to doing this. Use the 2″ screws and glue.

Step 4

Rustic Table
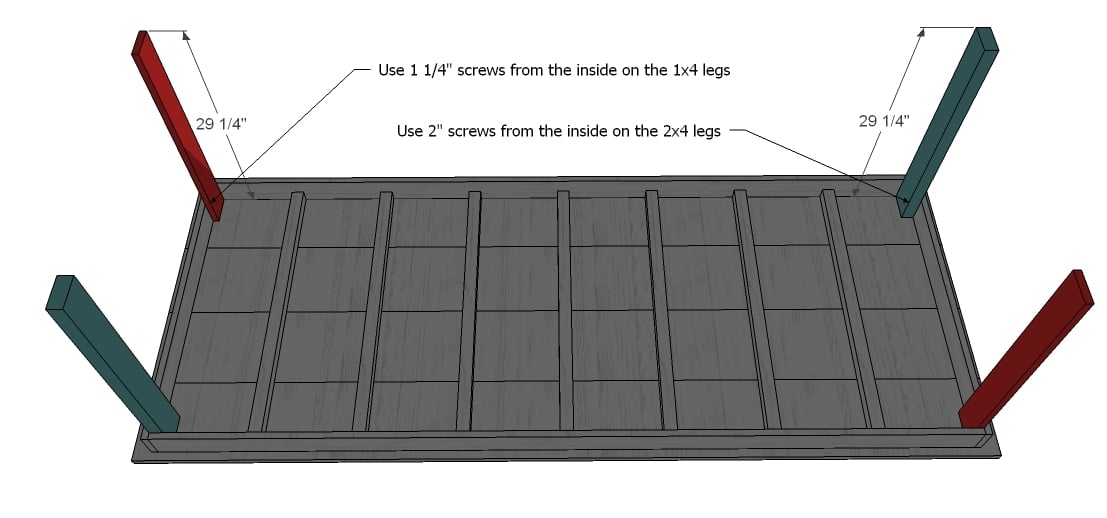
Legs. Fasten the legs to the aprons, as shown above. Do not use glue if you would like the legs removable.

Step 5

Rustic Table
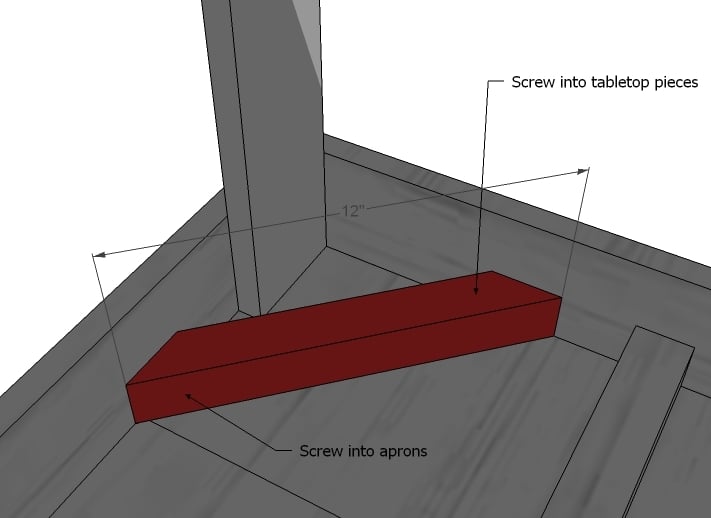
Cross Supports. For extra support, you can place a cross support on each corner as shown above. This will take any wiggle out of the table.
Rustic Furniture

Sunday, March 24, 2013

Add Hanging Windows

Choose and Paint Windows

Old windows are fairly easy to find. Salvage yards and second hand stores often carry antique looking windows. Find windows that have a thick enough frame for eye hooks to screw in without breaking the glass.

Cut Posts to Size

The windows hang from a simple support made from 4x4 posts: two that sit vertically in the ground and one piece that connects the two tall posts. Choose posts that are naturally rot resistant, such as redwood, pressure-treated lumber or cedar. The frame should be at least 6' tall and will need to be in the ground about 2' deep, therefore, 8' posts will work. Cut the top piece of the frame depending on the width of the window and the space you’d like between the window and the posts.

Stain Posts (optional)

Stain posts with an outdoor wood stain. Let dry for several hours.

Dig Post holes

Using a post hole digger or auger, dig two holes about 2' deep. Space the holes according to how wide the window is and the desired space between the window and the support posts of the frame.

Dry Posts in Concrete

Set the stained 8' length (or desired height) posts in holes. Make sure posts sit level and then add water to concrete in hole. Let dry overnight.

Cut Posts Level

Once the concrete is dry and posts have set up overnight, cut the posts at the same height. Use a string level to insure that they are cut level to one another. Use a circular saw to cut each post.

Add Top Piece of Window Frame

Add the 4x4 to the top of the cut support posts. This creates a frame for the window to hang. Toenail the 4x4 into the support posts, then using an additional piece of small lumber, secure screws into the 1x4 material into the frame joints to create a solid frame.

Attach Window Hardware to Windows

You can hang two windows from a frame or just one. For a single window, the hardware assembly is as follows: screw eye bolts to the top and bottom of each frame. Make sure the eye bolt is not too long that it breaks the glass. The eye bolts on the bottom are optional, they are there if you’d like to add a window weight to keep the window from swinging in the wind. Using two long lengths cable, loop the first piece around the top left eye bolt and use a cable clamp to secure the loop. Repeat on top right eye bolt. Make a loop at the loose end of each piece of the cable to attach to the eye bolt in the window support post. Loosely clamp the loop in place. Each length of cable should be about even, but you will have to adjust once it’s hanging. Connect a carabiner to the top loops on both sides.
If you want to hang two-stacked windows, repeat the steps above. Connect the windows through eye hooks, two lengths of cable, and create loops to string through each eye hook.

Secure Eye Bolts to Frame

Screw eye bolts into the 4x4 top piece of frame spaced at the same width as they are set on the window.

Hang Windows

Connect the carabiners attached to the top loops on the windows to the eye hooks in the support post frame. Make sure the windows set level by adjusting the size of the loop and adjusting the cable clamp.

Hang Window Weights (optional)

To keep windows from moving in the wind, hang old window weights on the bottom eye hooks of each window.